Crafty Blogs
Showing posts with label mini book. Show all posts

Friday, January 29, 2016

Mini Micro Album the easy way

Mini Micro, that will take 

Artist Trading Cards

This can be made with any size card.
I will use A5 card.

I scores  10cm and 20cm 
The 1cm at the end becomes my to glue it together.


I scored at 6cm,
so this will give me a 6cm and  9cm pocket.

Cut  the  scored line  
on the opposite side to you tab.


fold the 1cm tab over ,
and fold your pocket in half as in the photo.


Add glue along the tab,
and along the inside edge where you made your cut.


Fold the flap upwards on both sides,
press to make a good seal.
Leave for 5 mins to set.


Fold together so the cut at the center faces upwards.

This is your pocket ,
I made 6 but how many you make is up to you.

My pockets meaure 10cm wide
one is 6cm and the other is 9cm.

so your matting will be
8.5cm by 9.5cm Large
5.5cmby 9.5cm Small.

You will have 2 pockets to add your tags inside.
They will need to be 9.5cm tall but the width is up to you, I tend too stick a bit of card inside and see if I like how far it sticks out.

You can make a mini out of this,in several ways.

You can make a strip to attach these to a cover by 
scoring a long strip.
you will need a 9cm wide strip by about 21cm.

score at 3cm,
4cm 5cm and 5,5cm,
6.5cm 7.5cm and 8cm,
9cm 10cm and 10.5cm,
11.5cm 12.5cm and 13cm,
14cm 15cm and 15.5cm,
16.5cm 17.5cm and 18cm.

You make fold the 1cm folds together,
these are the glued together on the back,
So you get a 1cm high tab 
with a .5cm gap  between each one

Do  one tab at a time
Add glue to each side of the Tab,
And slide the end of you Pocket that doesn't have the fold onto Tab,
You will have to do this 6 times.

once all your tabs have pocket,
Leave for 10 mins so the glue sets.


To add a cover

Measure the spine of your minibook

Find some hard card, 
11cm by 24 cm
I have been using the backs of my pads of Paper.
You need to cut it 1cm bigger than you want the book to be as this means the Mini book pages don't over hand.

Score your card at 10cm and 14cm.
Bend the covers upwards to make your book cover.
Make sure your mini book fits inside.

You now need paper 13cm by 26cm.

Score 1cm around each edge.

Glue your card inside this score line 

Cut the corner either as a triangle, 
or just fold it down.
Press along the edge of the card
 to make a nice edge.

If you just folded it down you can remove some of the extra paper if it's too bulky.
Once you like it add glue and stick the paper to the card, along all four edges.

Place your mini book inside.

If you fold the 3cm tabs flat against the book


Add some glue to the back 3cm tab 
on each side of the album,
and across the spin
center this inside your book cover and press gentle on each tab.

Leave to set and then you can decorate.


And this is what happens when you use 
1cm in stread of ,5cm for the gap 
on the tab strip.


,


Wednesday, June 19, 2013

Smashing idea


I seem to have not done much on this blog for ages.
 
 
Joining a Smashed group on Facebook has made me want to post again, and yes my cinch came
 out to play.
 
 
Take a piece of card and fold it in half, cut of the corner.
 I used my envelope maker to get my corner straight, it's done on the folded edge, but you could just measure the same distance along the top and down the fold to get a perfect corner.
 
 
I then cover my page with paper, so it looks pretty.
Take your cut off corner, and simply add this to the oppersite corner from where you cut it off.
The fold should be at the bottom not on the side.
You can either add glue it all over the inside of the triangle and add it, or just put a thin line of glue at the bottom left of your page back and front, this turns the cut off corner into a tiny pocket.
It is up to you.
This means 2 of your page sides are now closed.
 
 
Punch holes on the side oppersite your fold.
Add something to bind it together, I used my spirals.
I then add ribbon, but have not shown this.
 
 
You can make this with any size paper.
 
Easy right.


Monday, October 08, 2012

Quick Birthday Scrapbook.

You will need

3  Sheets Card.
Some Scrapbook Paper.
Glue.
Something to cut with.
Ribbon and Decorations.
 
Ok off we go.
 
Can you see the patterned paper,
this is our hinge.

This is our make today.
 
Cut your A4 cardstock in half,
yes you can use A5 if you have it.
It measures 14.8 cm by 21cm.
But to be honest you can use any size card you like.
 
Making a page.
 
Fold  in half and crease all your cardstock.
 
Making a Hinge.
 
Now measure how high your card is
Mine is 14.8 cm.
Cut out of your Decorative Paper the following.
14.8 by 10.5cm
do this 5 times and fold them all so the pattern you want to show is on the INSIDE.
 
Take a folded sheet and place the fold on the left.
Take a hinge and place it so the fold is on the left as well.
 
Add glue to you hinge, along the top and bottom and along the folded edge.
Line it up with the page, and press down.
It is now a pocket on your page.
Look at the main photo to see where it goes if you need to.
 
Place another page nex to the first with the fold on the right and the hinge on the left.
Add glue to the hinge again on the top bottom and along the fold and join on the next page.
 
Now you just repeat this till your book has 6 pages in.
 
Decide which  is the back and which is the front of the book, and add glue inside the  middle of the white pages to seal the bottom and make a pocket.
 
Take another bit of patterned paper and cut it at 15cm by 7cm.
Add Glue to the top and bottom.
 
Add glue to the back and front of your book
along the spine.
 
And attatch the decorative paper.
This covers the spine of the book.
 
Now you can decorate it.
 
I added ribbon first
and glued it onto the back of the book so it was
but would open nicely.
 
The mirror topper is cut at 1 cm less than the size of the book.
 
i.e.
Book measures 15cm by  10.5cm
so I cut mine at  14cm by 9.5cm
 
If you wanted to add more cut at 13cm by 8.5cm
 
by going down in equal amounts your always going to be able to get it central.
It's called Matting and Layering.
 
Tags.
 
I used a stamping up punch for the tops of my tags,
but you could just use a square of patterned paper folded over.
 
To make my tag I tend to drop a piece of card inside that i know it too narrow for the pocket but it does give me the height of my tags.
15 cm by 10 cm.
 
Before you decorate your tags CHECK they fit the pockets.
Sometimes a pocket if glued
can be smaller than you think.


Friday, September 21, 2012

Look what I found. Yep a blog and a mini

 
I just found these little mini books in a box.
 
Had to look close to think how they were made.
They were A6 in size.
 
That would be 10.5cm high by 7.5cm.
 
Easy to do.
Mine was C6.
 
Cut an envelope to make a pocket.
 
Either seal an envelope and
 just cut 1mm of to open it,
or use a longer one and cut it in half.
 
Measure your pocket 
10.5cm by 15cm.
and cut the pages to the same size.
 
Fold everything in half.
Now glue a page to the envelope  front
and then fold so the page is inside.


Lay two of the folded envelopes next to each other
so the folds are touching.
Glue another sheet of paper to join both envelopes together.
 
You now have an envelope back showing,
3 double pages,
and another envelope back.
 
You just keep adding envelopes till you have enough double pages.
 
Cut one of the folded pages in half and glue one bit
to the front and one to the back.
 
To cover the spine I just glued a strip of paper over it, that was big enough to give me a 2cm overlap onto the front and back covers.
And added some page mats to each page.
 
what do you think?


Friday, January 13, 2012

What my kids did.


This is a very quick mini my kids made.

Not posted much for ages as have been busy.

It's just sealed envelopes cut in half and cinched.

Easy or what.

Monday, November 21, 2011

Fanciful Album,


Xmas Album.


This is made with the Sizzix Fanciful Die.


I saw it and wanted it, only it was out of shock.
thanks Netty who had one in her cupboard.

I really loved that it had the flower shapes and a label shape included even the heart is used as a leaf.

Mini Card.


Just love the way you get a pretty edge.
The stamp was a gift in a swap.
I have loads of the envelopes.

Wednesday, November 16, 2011

Quick Mini Books.


I need to use up some Papers and Stickers.

Yes the cheap ones I got.


You will need:
1 Sheet of 12 by 12 thick Scrapbook Patterned Paper.

3 Sheets A4 200gms Paper.


Cut from the A4 Paper
6 pieces of 5 1/2" by 8"
Score it at 4" so it folds in half.

From the pattern paper,
Cut a strip 5 1/2" by 12".
Cut into 6 strips  5 1/2" by 2"
Score at 1" and fold in half.
Add glue to the back of this strip,
Holding two of the plain paper together and add the patterned strip to the join.
Making a 5 1/2" by 16",


Continue holding another of the plain paper and joining till all 6 pieces have been joined together.

Leave to dry.


Once dry reverse the folds so the patterened paper is in the valley of the folds.
Add glue to the bottom inside of each of the pages and join together to make 6 pockets.

Leave to dry once more.

From the remaining piece of scrapbook paper
you need to cut the cover.

6" by 12".

Score at  1 1/4, 5 3/4" , 6 1/4" and 10 3/4".

Fold the 1 1/4 inch at each edge inwards, add glue underneath and seal down on both sides.
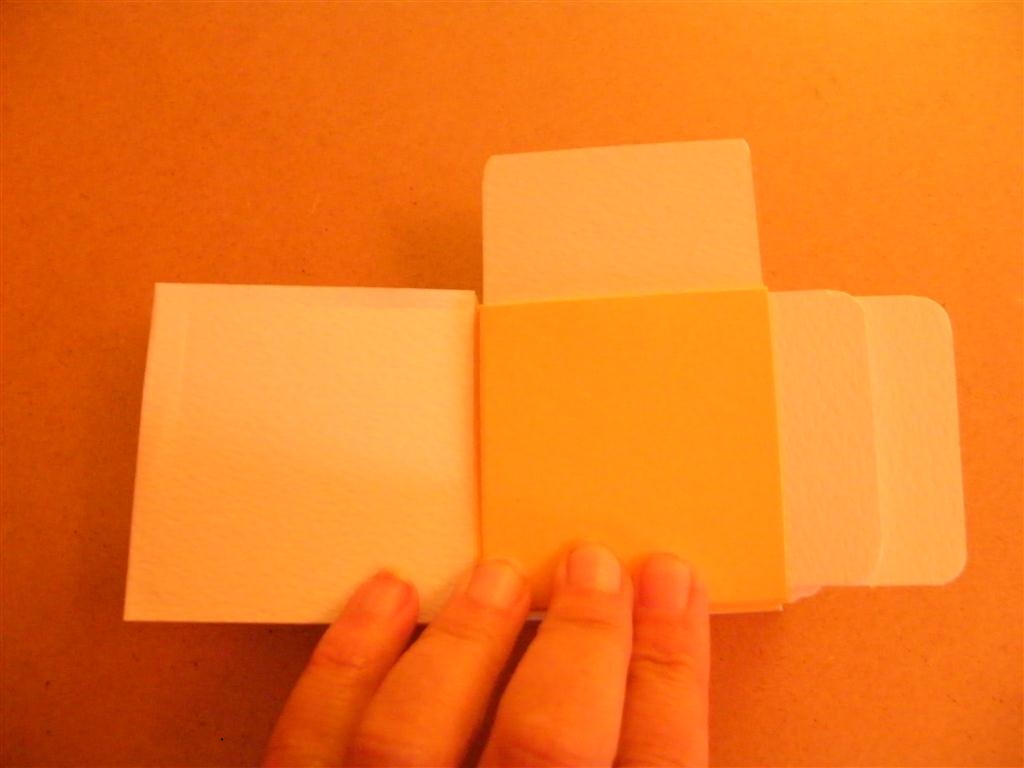

Add glue to the front and back of the book and fold the cover over so the book sits inside.


Done.

Now just decorate.


Saturday, November 12, 2011

Pocket Pages for Maddie.


My mother got me some of the 5 for £2 craft packs from C & C.


Maddie decided she wanted to use some on a book as I had been making them earlier in the day.

Not sure what your kids are like but mine
know what they want so gave up and let her raid the stash.


We took a A4 piece of card,
Scored it at 4", 8" and I just left the rest as my tab.

Then I scored at 7" to make my pocket at the bottom of the page.


Fold this up and it makes a pocket at the bottom of my page.

I folded the 4" section over.

As the bottom of the page pocket was not closed I simply cut a piece patterned paper 1 1/2" by 1 1/2".
Fold this in half point to point to make a triangle.
Glue this to the bottom of each side the page pocket.
It also adds decoration to the page.


This now gives you a pocket with a tab on the side.
A pocket on each page and a pocket at the top.
I mitered my edges and glued the flap to the next pocket page.
I made 5 in total and glued them all togehter..

As I wanted to stick mine into covers.
I made a tab for the other side too,
7" by  7"

Score at 3 1/2" miter the corners and add to the 1st pocket, this then glues onto the cover.

I still have to cover this but have give you a photo so you can see what I did.

My cover was worked out by doing this.

Page size. 4" by 7".

Add 1/2" for top.
Add 1/2" for bottom.
Depth of cover 8".

Add 1/2" for border .
Page Size 4"
Width of cover 4 1/2"
Add 1/2" for spine.
Double page size. 9".
Size needed 9 1/2"

Cover size if doing as one piece.
9 1/2" by 8".


So I scored it at 4 1/2" and at 5".
I just glued the book in at the scored lines.
Making sure it was equal top and bottom from edge.

I wanted to use some board inside my covers to make it stronger.

So I added and extra 2" to each measurement

Cover size if doing as one piece.
11 1/2" by 10".


 So I scored it at 1", 5 1/2" 6" and at 10 1/2".
Then at 1" and 9".

I used some board cut at 
4 1/2" by 8".
Added some glue to this and laid it between the scored lines.
Then add glue to the borders.
I folded the four corners in.
Then folded the sides down.
Then glued my book into the middle.

I will add some patterned paper to cover the
inside front and back to tidy it up.
7 1/2" by 4 1/4".

Look up a video on utube if you have never done this before as it can be confusing.

Hope you like it.

Monday, November 07, 2011

Variation on Pocket page.

I know this looks like the same thing but...
I realised I could cut it from a sheet of 12" by 12"
and have each side of the pocket and the flap any colours I wanted.
It also means you can use normal not double sided paper.

Cut your paper at 5 1/2"
Which leaves you a 6 1/2" piece.

You can have any size pocket width you like this way.
I cut one piece at 8" so when folded my pocket will still be
5 1/2" but 4".

I then cut a 4" by 6 1/2"
From this cut a 4 " by 4" square.
The piece that is left will be the bottom pocket.
Mine is  1 1/2"  by 4"
but you can use the whole bit left to create a deeper pocket seam.


Score all the pieced so they fold in half.
The bit at the top right is my fan fold.


Add glue to the side edges of your pocket seam or you won't be able to tuck a tag inside.
You don't need to glue the triangle flap as it will have the holes punched through and will stay put.

See looks rather like the post before.
Only the green was no the reverse of the double sided paper.

This next bit is a bit more complicated, but means you can have the flaps moving and they wouldn't have to be triangles.


You take your fan folded but of card.
As you look at it you need to cut 1 cm from the edge on the center two fold sections of the fan.

I then butted my cardstock so it covered the 4th section of the fan and glued the top and bottom section  1cm of the 3rd section to the cardstock.


Fold the middle section of the fan down and add glue between the cuts as in the photo.

You will find the cardstock won't open.
What sticks out is the back and front of the fan.
Add glue to these so it looks like my photo.

 The just add the folded triangle over the top so it covers the cardstock.
It means the whole of the triangle flap can lift up on the hinge you have made.

Once more added a seam pocket to the bottom to stop my tags falling out.
I know it looks fiddley to do but it does mean you can use all the inside of the pocket, but you can also glue it onto a scrapbook page and it would give you a pocket and the back to scrapbook on 


Friday, November 04, 2011

Pocket Page. Mini Book.


I was using some 6" by 12" double sides paper,

Which I had scored at 2", 6" and 10"
Then at 5 1/2".


I had folded the 1/2" up to make so it made a pretty border.
I had folded the side outside bits, but had left it like this on the table. 

I had left it on the side when my crafty little daughter who was watching me, decided to fold all the end corners down to be helpful as she thought I was making an envelope.


Not wanting to waste what looked pretty good.

I added glue to the corners and glued it down.

It was still flapping so I added a tiny dot of glue in the bottom at the fold, cinched the holes, and added glue to the bottom inside bottom, to turn it into a pocket.

Also realised if I had not glued it could have just folded it the other way round to make great pages in a book.

Think I owe someone a treat.

Tags will be 3 1/2" by 6" for inside pocket.
3 1/2" by 4 1/2" for the outside.

And I made 6 pockets from 3 double sided sheets.


Thursday, November 03, 2011

UK Scrappers One Stamp Swap.


Well this is my take on the one stamp.
They are all sat waiting to finish drying, as I used Glitter Glue for the lips and eyelids, it seems to take for ages to dry been out for 4 hours and still wet.
Think it may be an over night job to be sure.

I made a little 16 page book as I will be getting loads back stuck inside my book.
These are really easy and look great.


Sunday, October 09, 2011

Ok this is odd but it works as a way to make a page for a mini book.


Ok I got given some long strips of off cuts.

Mine are 6cm by 1 meter long.

Yep I know long strips.

Cut 6cm by 13cm.
Score at 6.5cm.
Fold in half..
Mark 1 and 2.

Cut another piece.
Book Jacket.
6cm by 23cm.
Score at 5cm, 11.5cm, 18cm.
If you marked the 4 sections,
A B C D.

Fold in half at the 11.5cm.
Then fold the 5cm bit inside on both sides.
A and B will touch,
C and D will touch.

See It is  a bit like a book jacket.

Now slide the first piece of folded card inside,
the second but the folds should be on 3 sides.

A and B will have 1 sandwiched in the middle.

C and D will have 2 sandwiched in the middle.

If you punch your holes in the unfolded side.
This gives you a pocket at the top.
Also two pockets on the side.

Tags need to be cut at 6cm by 7cm.


Making the book.


Was trying to see how to hold the the bottom of the
strip closed to make pockets.
Which is how I ended up doing the top as a sample idea.


It's going to be too hard to explain this so..


I scored the whole meter strip.
Every 6.5cm, it made a concertina.
But you can just glue lots of smaller strips
together to make a strip as long as you need.

Miss the first and use the 2nd and 3rd
of the strip sections.

Take one of the book jacket.
Hold the middle fold at the base wrap it round the 2nd and 3rd
and tuck the bit marked A inside.
You may need to bend it a bit and tuck D inside too.
Don't worry as you can't see if you bend or crease section D.

You now have a pocket.

Take 4 and 5,
Repeat using another jacket.

Keep going till you have one section left.
I had two, so I cut one off.

To make a cover..
Yep it looks like another book jacket.
Measure you spine on this book of pocket and and a 1/2cm.
Mine was 2cm including the extra.

So I need 30cm by 7cm.
So I score at 7cm and 14cm,
Turn the paper round and score the same again.
This way I know it will be same on each side.
Also works if you have a smaller scoreboard.

Add glue all over what is your wrong side
if your using patterened papers.
JUST DON'T ADD GLUE TO THE INSIDE SPINE
Place the spine of your pocket book to the
 unglued spine of the cover.
Line it up so there is the same distance top and bottom.
Sandwich the first  page of you book within the two bits 
of the cover.
Do the same with the back page.

I like covering them this way as it means
you have 3 pieces of card for strength.


I showed this so you can see one tag in the top and
one either side of the fold.
so no glue apart from the covers. 
If your card is not long enough for method all I do is
make the front and back section as two pieces and just join it where the spine would be.


Bigger pages.

29cm by 14 cm.
Score at 14.5 cm.
Mark inside 1 and 2.

Jacket cover.
30cm by 14cm.
Score at 0.5 cm,15cm, 29.5cm 

Mark A B C D.

Just wrap and tuck the
0.5 flap inside, you will need to add glue this time, to hold these tiny flaps inside.