Sunday, December 05, 2010
Thursday, December 02, 2010

Wednesday, November 24, 2010
Use Double sided pages to make Mini scrapbook


Laura at followingthepapertrail
I must admit to using her site loads.
She makes great stuff,
This year she is doing 12 different ideas.


This is my pink one.
It's 1/2 a sheet of double sided cardstock per page.
Laura has instructions to follow.
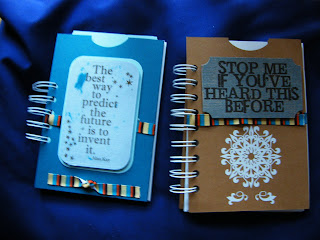
Notebooks with Anna Griffin Embelishments

Ok so this took me 20 mins to make.
All I did was stick a precut sheet to the front
and added one of the pre-made toppers.
But I think they will make great gifts.
Monday, November 08, 2010
Beaded Bracelets... Yes I made them.


We have been asked to show items we have made in the library in Weymouth next week. So since I dont just want to show my mini books I made some of these to put out. Thought I would show and tell.
Would you believe its all from stash and I didnt have to buy and extras to make them.
Thursday, November 04, 2010
Lean Mean Part 2 the big one..

I looked at Jimjams design and made this from an A3 Sheet of card in the same way.
Book Measure nearly 6" by 6".
But I cursed several times and had to go back to look at her pattern to see how to fold it.
To upsize it to any size paper you just need to score the cardstock in half.
Then score 1 1/2" at the bottom of the length and divide the rest by 3
A3 scoring Guide.
11 7/10" x 16 1/2"
Score at 1 1/2" , 6 1/2", 11 1/2"
Score at 5 17/20"
(your really just scoring on the A4 Half-fold line)
I did cheat and added covers from A4 cardstock folded in half and scored at same wide as my pages.
These were tucked into the middle fold as you can see in the photo below.

I used a pack of freebie 6 by 6 papers that I got off a magazine last year.
I added ribbon in the same way as the instruction sheet said to hold it together.

Here's the back of my book.
I added stickers of the puffy kind
that I found in "the works".

Got loads left to make some cards
or tags to match.
Have added the link again to the great tutorial.
as
Tuesday, November 02, 2010
One Sheet Bags

Cute bags to hold gifts.

I have made these for ages, but just seen some add the extra Cardstock at the top to reinforce the handles.
They are simple to make except for one fold.
Use an size card and decide how tall you want you inside box to be.
For a 2" box inside,
You score your card 2" from each side.
Then comes the maths...lol
What ever your cardstock length take 2" off
and divide the rest in half so you know where to score.
i.e 12 by 12 cardstock..
12 - 2 = 10 half of 10 is 5
So scoring will be at 5" and 7" for bag
Score at 2" and 10" for inside box.
I folded the 2" sides in and then you have to fold the side up to meet the edge.

I have taken a close up so you can see what happens.
But there is a cheat.

Measure the section Marked A.
Then mark the same distance on the edge of your cardstock from your centre fold.
You then score between where I have marked red dots. But if you have a 45" Protractor in your childs pencil case you can borrrow it.
Add glue only in the blue area.
It stops on the score line you made.
You can just fold the bag together and seal or you can add an extra 2" to the top to make it stronger.
I just measure how wide my bag top was and cut a piece of cardstock that was that length and 4" in width, folded it in half so it was now 2" wide and used that to stick it to the top of my bag.
I added pipecleaner handles.
Some Ribbon to decorate and also to hold the centre closed.
If you wanted to use an A4 cardstock.
You would score 2" from each side and
I cut mine down to 11" because it made my sums easier to do.
11-2 =9 half this is 4 1/2"
So the scoring was 4 1/2" and 6 1/2".
12 by 12.
For a 3" box inside .
Score at 3" and 9"
12-3 =9 half this 4 1/2"
So the scoring was 4 1/2" and 7 1/2" .
Hope this makes sense.
My Guy Christmas Album

This is my Christmas "My Guy" Album
I saw the design from Laura at The Paper Trail.
Her work is amazing.

All the pages open up and have lots of space to add pictures, DD2 made me add a few of her Foam Stickers from the 99p Store.

Each page back gets a pocket at the bottom that looks like the trousers with a belt.
Added is a tag with a folded top to make a shirt.
The stud was DD2's idea again.

I thought the pink snow flakes looked like a pair of PJ's but someone else said looks like a lady.

I just love this sweater one, with it's ribbon tie, the base card is a lovely green but you can't see it here.

Yes I used red velvet cardstock,
never again do you know do much it shows any glue you smudge.

Last one.
This is the back page, I Cinched it...
and added some ribbons to my binding.
All the pages are made by the same method as my other books, you just add the jacket sides in to make it like a gatefold.
Friday, October 22, 2010
Hallow Mini Album Long with pockets

This is one that I made a few weeks ago from paper included in a swap.
It measures 8 1/2" by 4 1/2"
Or 21cm by 11cm ish..
All I did was folded A4 cardstock in half and folded about 3" up to make a pocket
which I glued at the edge.
I had loads of sticker edges and used these for decoration, as well as the small Halloween tags that came as a 12 by 12 sheet of cardstock.
But must admit some pages are smaller as I took any paper I had to hand and just folded it too make pages.
Extra pieces were cut for tags

The Scalloped Green and black paper was one I loved but couldn't think how to use it.
So I scored it at 4" 6" and 8"
Turned and scored it at 8"
This then folded into a pocket page.
Cropped the corners...
And yes I "Cinched it all together"
Added some Fiber and a Tiny Pumpkin from Janice.
Thursday, October 07, 2010
My boxes for sweets for Halloween.
Here Is the link I found for the boxes.
Denna made them and they are so cute.

The Devotion one is made with the measurements given by Denna.
Two strips of paper.
2" by 7" for box.
2" by 7 1/2" for lid.
Score both at:
2", 3", 5" and 6".
For box you just fold it round and glue the last bit to the 1st section to make a box with no base.
Fold the second for the lid, and just wrap it round the first base.
Add glue to the 2" sections.
You then just decorate.
The square Half & Half is made with a 2" measurement.
Two strips of paper both
2" by 10"
Score at 2", 4", 6", 8".
Fold and glue one for the sides.
Then add the other to make the base and lid.
Wednesday, October 06, 2010
Tent Card make your own.

I keep seeing this type of card and realised there is an easy way to make them.
Take an A4 Card and fold in half
to form a normal A5 card.
Then just score at 1/2" from each edge.
Add double side tape to these tabs,
Then fold them inwards.
Take another piece of A4 Card.
Trim it down to 11".
I scored mine at 3 1/2 " and 7 " and 9".
Fold your card so you get two peaks.
Now just add the larger card using the double sided tape to attatch the larger card,
your joins are hidden inside.
You can use various sizes for the two peaks.
3" and 6" then 8 1/2"
2 1/5" and 5" then 8"
The reason I cut the card to 11" was to make my sums easier...
In cm..
Score 1.5 cm from edge.
From base card.
cut to 29cm.
9cm and 18cm then at 23.5cm
7cm and 14cm then at 21.5cm
6cm and 12cm then at 20.5cm
Just added a picture to show where to glue.
On the card add glue to the red section.
The green line will match up on the base below.

Just added a picture to show where to glue.
On the card add glue to the red section.
The green line will match up on the base below.

Once you fold the tabs inwards you will find the green and red lines match up, on the base.
Tuesday, October 05, 2010
Lean mean Scrapbook ...
Click here to follow her link for instructions.

This great little book is someone elses design.
Click on JimJams Idea above to get the instructions.
It's quick to make.
All I did different was to make one of the long pockets for a cover instead.
A4 cardstock Scored at 5" , 5 1/2" and cut at 10 1/2"
Score the other way at 4" and 8".
Fold over and punch circles at the edges.
Add Ribbon and glue inside, either the full length of the book or just at the edges.
Fold the 1/2" left over and use as a tab to glue the pocket together.
You can either glue the back page down as JimJam did or make a small hinged section for the centre,
Take a scrap of cardstock that is 3" by 1 1/4"
Score it at 1" and fold to make an L shape.
Glue the 1" section to the inside of page 3.
This leaves 1/4" peeping out.
Before you seal the bottom of the pocket.
Glue the other to the inside of page 5.
Again leave the 1/4" peeping out.
This will then fit into the 1/2"
centre of the inside cover.
Check for size and trim the flaps if they seem to big.
Add glue and hold together for a few seconds.
Stepper Draws A4 Cardstock size.

This was a Stepper Card Design that I saw Here
This one is made with an A4 piece of cardstock.

If you want it inches.
Draw a line on back of your cardstock.
Make a mark 4 1/8" down and 1 1/4" in from the edge.
Turn the card round and make a mark in the same place on the other side of the cardstock.
Use a ruler and cut this line with a knife.
Every line you score goes upto but not over this line.
With the right side of your card facing you score at 6", until you meet the cut line.
This is the step on the left in the photo.
Now score at 1 1/4" from the cut line to the edge.
At 2 1/2" and at 7 1/4"
The Pink layer with the flower measures 3 3/4" by 4 1/4"
The draws measure 3 3/4" by 1 1/4".
Draw a line on back of your cardstock.
Make a mark 10.5 cm down and 3cm in from the edge.
Turn the card round and make a mark in the same place on the other side of the cardstock.
Use a ruler and cut this line with a knife.
Every line you score goes upto but not over this line.
With the right side of your card facing you score at 15cm, until you meet the cut line.
This is the step on the left in the photo.
Now score at 3cm from the cut line to the edge.
At 6cm and at 18cm.
This gives you the base.
The Pink layer with the flower measures 9.5cm by 11cm.
The draws measure 3cm by 9.5cm .
I inked the edges to make them stand out.
I added an eyelet as a handle and used my punches to decorate the base of the design.
Thursday, September 30, 2010
Ruck-Sack Mini Scrapbook..

Hope you like my Rucksack Style Mini Album.
It is very easy to make and you need the following to make one.
2 A4 sheet of card. White
3 A4 Sheets of Patterned Paper.
Score the White cardstock at
Fold cardstock in half or Score at 5 3/4"
Then Score at 5" and 6 1/2" .
This gives you an M shape.
Now turn card and score at
3 3/4 and 7 1/2" Which leaves you about 3/4" for a Tab.
Crease the card along all the lines.
Fold the tab inside and glue to make a long pocket..
You can punch the half circles if you want, at each end.
To make the top flap,
Cut a piece of White cardstock 3 3/4" by 5 1/2"
Add 3 1/2" by 5" patterned paper to decorate.
Score this at 2 1/2" and 3".
Glue one of the 2 1/2" flaps to the top of one pocket.
You can add a hook and loop circle under this to keep it closed.
To make the Bottom pocket.
Take a Piece of patterned paper 6 1/2" by 6"
Score this at the 3 and 6" mark to leave a 1/2" tab.
Turn and score at 3" .
Fold the tab inside and glue to make a long pocket.
You can punch the half circles if you want, at each end.
To make the top flap. For the bottom pocket.
3" by 3 1/4" white cardstock.
Then Score at 1 1/2" and 1 3/4" .
Glue one of the 1 1/2" flaps to the top of one pocket.
Glue this to the front of the Rucksack at the bottom.
You can add a hook and loop circle under this to keep it closed.

This picture shows the M fold.
You make the 2 patterned pockets for inside
the same way.
Fold cardstock in half or Score at 5 3/4"
Then Score at 5" and 6 1/2" .
Then Score at 5" and 6 1/2" .
Turn score at 3 1/2 and 7".
There will be about 1 1/4" left as a tab.
Fold the tab inside and glue to make a long pocket.
Place it inside as in the photo.
You may need to trim a small amount of each end to get a better fit.
You can punch the half circles if you want,
at each end.
Glue the pocket inside.
By adding glue along the center fold only.


Finish by adding some ribbon as a handle.
Wednesday, September 29, 2010
Bags for treats.

Not sure if you can see these bags, they were made to put party gifts in, I got the cardstock from the West~Point Show in Exeter, and it was so pretty I liked it just as it was.
I used a to whole A4 sheet to make it.
Score at 4.5cm, 14cm, 18.5cm and 28cm.
Turn the card round and score at 4.5cm and 19cm.
Crease all the lines. Then cut the red lines.

It should look like this, the red box is removed.
You then add glue to the top fold and glue it down.
This gives you a nice top to the bag.
Add glue to outside of the flap on the left hand side.
And fold together to make the bag.
And fold together to make the bag.
Fold in the base and glue down.
To get the folded in look, just squeeze the corners gently and they fold in by themselves.
To get the folded in look, just squeeze the corners gently and they fold in by themselves.
If you want to make it in inches, I used this size.
1 1/2 ", 5 1/2", 7", 11".
Base and Top 1 1/2" and 7".
Once you make one it becomes easy to do.
Just remember to make the base the same size as smallest sides or it won't fold.
The top you can either make bigger or just forget about, I do it because it adds strength.
http://www.youtube.com/watch?v=tJeQ1YvTLlc&feature=related
This is a link to one, made the same way just a different size.
Oh and she doesn't add a top fold.
Tuesday, September 21, 2010

I was messing around with a Free Serif Program.
Under the shapes is a rectangle.
If you add one it has nodes for the corners that you can change.
So I made a sheet of Stub Ticket Blanks for sharing.
Just right click on the picture and print it.
Hope you can all use it.
Think I may add one with Christmas Wording inside.


Sunday, September 19, 2010
Acetate cover mini.

This little mini was from an idea I saw on another blog. Marion at "A piece of crafts" on her Ustream.
Too make this you need:
1 Piece of 12 by 12 Scrapbook Paper
2 Sheets A4 White Card
1 Sheet Acetate. Mine had flowers on.

I only had to use one sheet of scrapbook paper,
which I got in a swap from Ukscrappers.
Pocket Page.....
You cut the paper at 7" tall and 6 3/4" wide.
Score the paper at 3 3/8" or just fold it in half...
Next score at 5" and fold at the bottom 2" to make a flap, you can have this on the inside or the outside.
Mine is on the inside, the bit in the second photo with the leaf and the branch on.
I glued just the edge to make a pocket.
Inside page 2...
There is a piece of scrapbook paper left,
that is 12" by 5" in length.
I cut this at 6 1/2" scored it at 3 1/4". Fold.
This is the bit you can see between my fingers..
The bit of card stock left is 5" by 5 1/2".
Yes you guessed I cut this too.
5" by 3 1/2" it makes you another page you can add into the album
Out of the last large piece of scrapbook paper that remains. It measures 5 1/4" by 7"
You can either make a folded page by cutting it at
5" by 6 3/4" and folding it in half.
Or cut two more 3 1/2" by 5".
I always use my off-cuts to decorate with.
It's amazing what a tiny strip of 1/4"
scrapbook paper adds to a page.
White Pocket...
I took a piece of A4 card stock in White Hammered.
and cut it at the 6 3/4" mark.
This was scored once more at the 5" mark and folded in half and glued to make a deeper pocket.
Make 2...
Inside page 1...
The bit I had left was with was just under 5" wide, so I cut it at 6 1/2" and just scored it at 3 1/4".
This is the inside page on the second photo.
Just to the outside of my fingers.
It has the stub book corners.
I also cut the last piece of card stock into pages too, they are just under 5" by 3 1/4.
Last I cut some Acetate covers.
These measure 5" tall by 3 1/2" wide.
Once you have made all your pages.
Use the cinch to cut all your holes,
Mine has 9 holes but you can use as many as you like.
Mine is layered like this, with each open.
Pocket Page..
Inside Page 1..
Inside Page 2..
Fold closed. To make my center..
So my final layers are..
An Acetate cover.
A white page.
A scrapbook page.
A White Pocket.
The Folded Pocket Centre.
A White Pocket.
A scrapbook page.
A white page
An Acetate Cover.
Then I just Cinched it all together.
I love Acetate for covers because I can just add a hole and lace the ribbon through it.
Well now I've made this one I should be able to read this an remeber next time...
Friday, September 17, 2010
Stamp storage. Mini style...

Ok, now this is my idea, suddenly reallised how I could store and use up some of the cardboard boxes that I seem to collect by the handful.
I cut open a Coco-Pop Box, and made an envelope form it. I added 1/2 " to the width of my stamps, to make a nice fit, then added about 1" for each flap of the envelope.
I also added an extra inch to the depth of the envelope so I could cinch some holes, which I am going to add my binding to, I want to use to rings that open and close so I can add more envelopes as I make them.

Here's the sealed envelope.
With my stamp sheet inside.
I've left the outside blank but intend too label it with what is inside, also thought I could stamp images when I take them out to use next time.

Thursday, September 16, 2010
Finished Easy scrapbook..part 2
I decorated the front of the one I showed you yesterday, and along side is one I made with more binder holes.
I really want to make a bigger one next, as I have some baby bits I want to make into a scrapbook.
I have been trying to use up the bits in my bit box.
Once a month I sort them into colours and try to use up all the tiny bits to make cards or scrapbooks.
Otherwise I end up with a massive box on the table full of odds and ends.
Wednesday, September 15, 2010
Easy Scrapbook or Notebook..

Ok, bad picture but you can see my basic design.
I take A4 paper or thin card for the inside and cut it into A6 size.
So I get four sheets from each original sheet.
I then take an A5 card and just fold it in half to make my covers. But you could just cut a A4 in half.
I punch my insides with the cinch.
Making the cover into a pocket.
Take the folded A5 card and add glue in a thin line at the bottom, punch a half circle at the top of the card going through both layers.
Then punch holes in the side that doesn't have the fold with the cinch.
This way you don't need to add glue and once bound it will form the pocket.
Once the book has been cinched, I add an insert that is 1cm thinner and shorter that the cover size, this way it slides inside easily.
I must admit I have been letting the kids use these as notebooks. So far this week we have made 6.
They have used what ever odds and ends they could find to decorate the covers, both back and front, as with kids more is always more...
My Daughter has even made one for the Teacher, who loved it.
Subscribe to:
Posts (Atom)